At Home Bikini Wax: A Step-by-Step Guide to Silky Smoothness
The world of self-care and personal grooming is vast, encompassing everything from spa treatments to home remedies. While many of these treatments can be pricey in professional settings, taking matters into your own hands can be cost-effective and rewarding.
One such treatment is the bikini wax. While the thought of doing it at home may sound daunting, with the right tools, knowledge, and a bit of bravery, it can lead to silky-smooth results.
Utilizing wax strips can offer a quick and convenient method, but hot wax is often preferred for those seeking longer-lasting results. Properly managing pubic hair ensures aesthetics, personal hygiene, and comfort.
In this article, we discuss at home bikini wax procedure and provide a step-by-step guide to silky skin.
Side note*
As we explore at home bikini wax in this article, keep in mind that there are long-term, cost-effective hair removal options available as well.
At KetchBeauty, we offer a range of innovative products designed to keep your skin smooth and hair-free for longer periods of time.
So, as you dive into this article, remember to stick around to the end, where we'll introduce you to the future of hair removal.
Why Choose At Home Bikini Wax?

There's a growing trend towards DIY beauty treatments and with good reason. Firstly, think of the dollars you’ll save. Professional salon treatments often have a hefty price tag, especially if you maintain regular maintenance.
An at-home bikini wax saves money and offers the convenience of not booking an appointment.
Plus, there's the added benefit of privacy. No more awkward conversations or positions with an aesthetician; just you, in the comfort of your own space, taking things at your pace.
Moreover, using a wax strip or investing in a comprehensive wax kit empowers you with the tools to achieve hair-free skin whenever desired. It's personalized, immediate, and entirely in your control, ensuring you're always ready and confident.
Types of Bikini Waxes

One will encounter various methods and styles when delving into bikini waxes. Cold wax strips offer a quick and less messy approach, while some techniques aim to remove all the hair, providing a completely smooth finish.
Regular Bikini Wax
This method removes hair from the sides of the bikini area. As hair grows in different directions in the bikini region, applying and removing the wax appropriately is essential to ensure efficient hair removal.
Any excess wax left behind can be easily removed with a waxing oil or gentle cleanser for a clean finish.
French Wax
This goes slightly further than usual, taking hair off the top to make a more defined triangle. By targeting the hair follicle at its root, French wax ensures longer-lasting results than superficial hair removal methods.
Professional wax products can enhance the experience, giving a smoother finish and reducing the chance of skin irritation or ingrown hairs.
Brazilian Wax
This is the most comprehensive, removing all or nearly all hair from the front, sometimes even from the back.
When opting for a Brazilian, choosing a high-quality bikini wax kit designed to cater to the delicate skin in this area is crucial.
Such kits often contain ingredients that soothe and protect, ensuring minimal irritation and maximum comfort.
Essential Tools and Supplies
Tackling coarse hair demands the right tools and supplies, especially when doing your Brazilian wax at home.
Equipping oneself properly ensures efficiency, safety, and comfort during waxing.
- Wax (hard, soft, or pre-made strips).
- Wax warmer for melting the wax.
- Spatula for applying wax.
- Strips for removal (if using soft wax).
- Pre-wax oil to protect the skin.
- Post-wax soothing lotions or aloe vera.
- Optional: Numbing creams or sprays for pain reduction.
Pre-Waxing Preparations
Before you begin, ensure your skin is clean and exfoliated; this aids in easier hair removal. Your hair should ideally be about a quarter of an inch long. Too short, and the wax won't grip properly; too long, and the process can be more painful.
Regarding pain, consider numbing creams or planning your waxing after your menstrual cycle when pain tolerance is higher.
- Skin Prep: Moisturize a day before waxing, but avoid lotions or oils on the day off to ensure the wax adheres effectively.
- Exfoliation: A gentle scrub can help free any trapped hairs, allowing for cleaner waxing.
- Hair Length Check: If your hair is too long, gently trim it using scissors or a bikini trimmer.
- Numbing Creams: If you opt for a numbing cream, apply it 30 minutes before waxing. Make sure to choose one that's safe for intimate areas.
- Stay Calm: Engage in deep breathing or meditative practices before starting to calm any pre-waxing nerves. This can make the process smoother and less painful.
Step-by-Step At-Home Bikini Wax Guide

Embarking on your Brazilian wax journey at home can be a rewarding experience, but it's vital to follow a meticulous procedure to ensure optimal results and minimal wax residue.
Let's delve into a detailed, step-by-step guide to assist you:
Step 1: Setting the Mood
Choose a comfortable spot, play calming music, and ensure good lighting. Having the right ambiance can make a significant difference in your waxing experience. The calming music helps soothe any nerves and distracts from potential discomfort.
Good lighting is paramount to see every hair and ensure even application and effectual wax removal. Remember, the more relaxed and comfortable you feel in your chosen spot, the easier the process will be.
It's not just about removing hair; it's about creating a self-care moment. So, take a deep breath, let the music envelop you, and trust your preparation to make this a seamless experience.
Step 2: Heating the Wax
If using hard or soft wax, melt it in a warmer. Test the temperature on your wrist. Ensuring the wax reaches the optimal temperature is crucial for efficiency and safety.
Too hot, and you risk burning your skin; too cool, and the wax won't adhere to the hair properly.
Using a warmer provides consistent heat, making the wax application smoother. Testing on your wrist, an area sensitive to temperature variations gives you an idea of how it'll feel on more intimate regions.
Also, remember that wax cools down over time, so maintaining its temperature is essential. If it's your first time, it's better to err on caution and start with a lower temperature, adjusting as needed.
Step 3: Applying the Wax
Apply the wax in the direction of hair growth using the spatula. For those attempting their Brazilian wax, this step is pivotal.
Utilizing the spatula, aim for a thin, even spread. If the wax layer is too thick, it can lead to breakage or incomplete hair removal, while too thin might not grip the hair effectively.
Given that the bikini area has varying hair growth directions, applying meticulously is imperative. Ideally, your home wax kit should come with a spatula designed for precision, aiding in this endeavor.
The key is patience and consistency. With each application, you'll gain more confidence and expertise in mastering your Brazilian wax at home.
Step 4: Removal
Hold the skin taut. Pull off the wax or strip against the direction of hair growth quickly.
The removal step is where the magic happens, but it's also the step that can be the most daunting for many. Holding the skin taut is essential to minimize pain and ensure a clean pull.
The quick motion is crucial: a slow pull can cause more pain and might not effectively remove hair. It's also beneficial to exhale as you pull, as this can help reduce discomfort. If you're using strips, press them firmly before removal.
The sensation might be intense the first few times, but with consistent practice, your technique will improve, and the process will become more manageable.
Step 5: Reaching Difficult Spots
Be extra cautious, using a mirror if necessary. Remember always to hold the skin taut. Navigating tricky areas, especially during an at-home session, can present a challenge. However, you can make it easier on yourself with diligence and preparation.
A hand mirror or a stand-up mirror can give you a clear view of those hard-to-reach places, ensuring you don't miss any spots or apply wax unevenly. The importance of holding the skin taut in these areas cannot be overstated, as loose skin can increase the risk of bruising or minor injuries.
Taking time, focusing on precision, and getting into unique positions will ensure a thorough and safe waxing experience.
Post-Waxing Care
Your skin might be sensitive after waxing. Avoid direct sun exposure, hot baths, and tight clothing for 24 hours. Apply soothing products like aloe vera or tea tree oil to calm the skin.
Exfoliate in a few days to prevent ingrown hairs:
- Hydration: Drink plenty of water post-waxing. Hydrated skin can recover faster and stay smoother.
- Cool Compress: Applying a cold compress can help reduce immediate redness and provide relief from any burning sensations.
- Wear Loose Clothing: This allows the skin to breathe and reduces the risk of friction-induced irritation.
- Avoid Sweating: Skip the gym and other sweat-inducing activities for at least a day to prevent potential breakouts or irritations.
- Ingrown Hair Prevention: Use specially formulated lotions or serums to reduce the risk of hair growing back into the skin.
- Avoid Fragranced Products: They can further irritate the skin. Opt for unscented moisturizers or oils.
Common Mistakes and How to Avoid Them

Ensure the wax isn't too hot to prevent burns. Always pull the skin taut to minimize pain and maximize hair removal. Avoid repeatedly waxing over the same area, as this can irritate the skin.
And lastly, always follow post-wax care recommendations to keep your skin smooth and irritation-free:
- Wrong Hair Length: Not trimming hair that's too long or attempting to wax hair that's too short can lead to ineffective waxing. Aim for the sweet spot of about a quarter-inch in length.
- Skipping Patch Tests: Especially if using a new wax product, always perform a patch test to prevent potential allergic reactions.
- Not Prepping the Skin: Always cleanse and exfoliate before waxing. Clean skin ensures better wax adherence, and exfoliation removes dead skin for smoother results.
- Rushing the Process: Take your time to ensure every step is done correctly. Hastiness can result in missed hairs or increased pain.
- Using Old or Expired Wax: Always check the shelf-life of your wax products. Expired or deteriorated wax might not give optimal results and could irritate the skin.
Best Bikini Waxing Alternative:
Instead of painfully waxing away unwanted bikini hairs, try using an IPL (intense pulsed light) hair removal handset - We carry those here at KetchBeauty.
IPLworks very similar to laser hair removal and you may have heard about this before. People often refer to IPL handsets for home use as “at home alser hair removal” Feel free to check out our shop to start your hair removal journey and say good bye to unwanted hairs and razor bumps for good.
Do Your Bikini Laser Hair Removal at Home With The KetchBeauty Handsets

Intense Pulsed Light (IPL) handset offers a cutting-edge method for hair removal that is longer-lasting than traditional methods.
Here's a breakdown of what IPL is, how it works, and specific information on using the KetchBeauty range of IPL handsets:
Understanding IPL:
- What is IPL? IPL uses broad-spectrum light that targets the melanin in hair. This light then converts to heat, damaging the hair follicle, which reduces hair growth over time.
- Long-Term Solution: IPL isn't a one-time solution. It requires multiple sessions but offers a significant long-term reduction in hair growth.
KetchBeauty’s IPL Range:
- OG IPL Handset: The OG is KetchBeauty’s original device. It offers an ergonomic design suitable for first-time users. This handset can be used on any body part, including the face and bikini.
- V4.1 IPL Handset: The V4.1 boasts faster results than the OG, with users seeing changes in as little as 2-3 treatments. It also has an improved ergonomic design and can be used on all skin tones except the darkest.
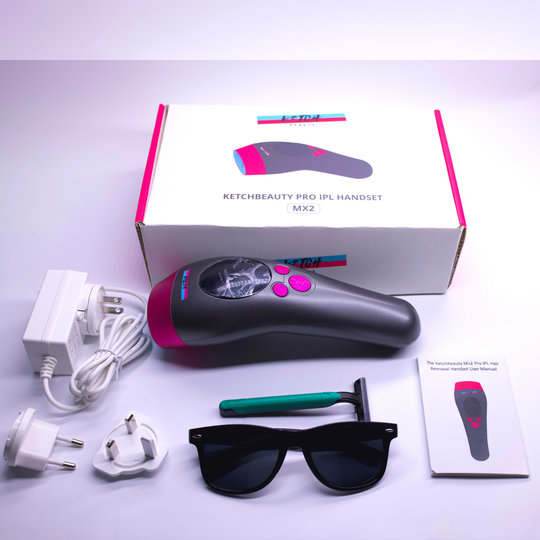
- MX2 Pro IPL Handset: The MX2 is the most advanced in the range, offering the fastest treatment time. It has five energy levels to cater to different hair types and densities.
Effortless and PERMANENT full-body hair reduction/removal at home with the KetchBeauty MX2 IPL Hair Removal Handset
Say goodbye to unwanted face & body hair for good and enjoy soft, smooth, hair-free skin and professional-quality results in the comfort of your home with the Mx2 Pro IPL hair removal handset.
- User-friendly design
- ⭐Digital interface (new*)
- ⭐999,999 pulses (new*)
- ⭐Usage tracking (new*)
- ⭐8 intensity levels (new*)
- ⭐Ice cold mode (new*)
- Automatic flash mode
- ⭐Lifetime warranty (new*)
- ⭐6 months money back (new*)
- Suitable for full-body use
- ⭐For all skin tones (new*)
The Mx2 IPL handset is most effective on black and dark brown hair and is unsuitable for removing red, white, grey, or blonde hair.
Say goodbye to unwanted hair with confidence and enjoy the convenience of long-lasting results.
Choose KetchBeauty and transform your hair removal routine today!
User Manual

Using KetchBeauty’s IPL Handsets:
- Preparation: Shave the area you're going to treat. This ensures the IPL energy is focused on the hair root and not wasted on the hair above the skin.
- Choose the Right Energy Level: Start with the lowest energy setting for first-time users and work your way up as your comfort allows. The MX2's varying energy levels offer flexibility for different hair types.
- Consistent Sessions: Use the device once a week for the first 12 weeks for optimal results. After this initial phase, use it once every month for the next three months or until you achieve your desired result.
- Post-IPL Care: Avoid exposure to the sun after treatment, as the skin will be sensitive. Use sunscreen if you're going out.
Safety and Side Effects:
- Test Patch: Always do a test patch 24 hours before complete treatment to ensure no adverse reaction.
- Avoid use on Tattoos: Do not use IPL directly over tattoos, as it can cause skin burns.
- Side Effects: Some might experience slight redness post-treatment, which usually subsides within a few hours.
Conclusion:
IPL, especially with the advanced features and effectiveness of the KetchBeauty handsets, offers a promising long-term solution for those looking to reduce hair growth.
Following the guidelines, maintaining consistency, and prioritizing safety is essential to achieve the best results.
Please note that for a more detailed and personalized guide, one should refer to the user manual of each KetchBeauty product and consult with professionals if unsure about IPL treatments.
Final Words
Taking control of your grooming routine can be empowering. While a bit intimidating at first, an at-home bikini wax can be a game-changer for many, offering salon-like results from the comfort of your home.
With patience, practice, and the right tools, you'll be on your way to achieving that silky-smooth feeling every time. Remember, confidence is vital.
Embrace the process, learn from any hiccups, and celebrate the newfound independence and self-reliance in your beauty regimen.
FAQs
How safe is it to do a bikini wax at home for beginners?
At-home bikini waxing can be safe for beginners if you follow instructions diligently, use quality products, and take precautions. It's essential to do a patch test first, ensure the wax is at the right temperature, and consistently pull in the opposite direction of hair growth to minimize skin irritation.
Can I wax if I have sensitive skin?
Yes, those with sensitive skin can wax, but extra caution is necessary. Opt for waxes formulated for sensitive skin, avoid waxing during peak hormonal times like menstruation, and always perform a patch test. Apply soothing products like aloe vera to calm any redness or irritation post-wax.
How do I prevent ingrown hairs after waxing?
To prevent ingrown hairs, exfoliate the waxed area gently 48 hours post-waxing and continue doing so 2-3 times a week. This helps remove dead skin cells that can trap hair. Also, moisturize regularly, avoid tight clothing immediately after waxing, and resist the urge to pick or scratch the area.
What's the difference between hard wax and soft wax?
Hard wax hardens on the skin and can be pulled off without strips, making it ideal for sensitive areas like the bikini line. Soft wax requires removing cloth or paper strips and is often used for larger areas like legs. It adheres well but might be slightly more painful than hard wax.
Related Products and Recommendations:
KetchBeauty Hair Removal Spray

Looking for a simple, mess-free alternative to razors?
KetchBeauty Hair Removal Spray offers an easy way to remove unwanted hair.
Just apply, wait, and wipe away!
Our unique formula works close to the root, ensuring smooth skin for days longer than shaving.
Plus, it nourishes as it works, leaving your skin feeling silky smooth.
It's a time-saving, skin-loving solution that fits perfectly into your busy life.
Check out The KetchBeauty Hair Removal Spray
KetchBeauty Hair Growth Inhibitor Cream
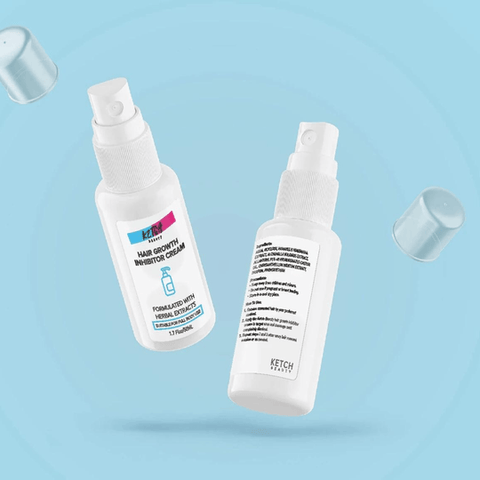
Tired of the continuous cycle of hair regrowth?
Our Hair Growth Inhibitor Cream works to minimize the regrowth of hair, meaning you'll spend less time and money on shaving or waxing.
The cream penetrates the hair follicles, reducing hair growth at the source and keeping your skin smooth for longer.
It's the ideal companion for anyone seeking to reduce the frequency and cost of hair removal.
Remember, the goal is to spend less time on hair removal and more time enjoying your life.
Check out The KetchBeauty Hair Growth Inhibitor Cream
With KetchBeauty, you're not just investing in products, you're investing in a smoother, more carefree future.
Say goodbye to disposable razors, and welcome a world where you are in control of your hair removal routine.
Try KetchBeauty today!